Blog

CMairsCreate and Candyce Mairs blog about Adobe Dreamweaver, ColdFusion, Acrobat, Captivate, eLearning, Fireworks, Photoshop, Illustrator, InDesign, Livecycle Designer and all things web and mobile. Learn tips and tricks on a variety of web, PDF, and elearning in the posts below.

Adobe Discontinues Acrobat Mobile Link

Adobe recently announced that the mobile link feature available now in both Adobe Acrobat and Adobe Acrobat Reader will be discontinued on July 12, 2016. In case you were not aware, the mobile link feature automatically uploaded and stored documents to your Document Cloud account.

The Document Cloud is still available to use across all devices. Simply save your files to Document Cloud from any device, and that file will be available from any device. This is a great feature that it has taken me some time to implement. I was so used to not have that storage space, and needing to copy files onto a USB drive or copy across my network in order to view or work on files on my desktop, tablet or phone. Now that Document Cloud is a part of my workflow process, I could not live without it.

For more information and what this means for you, go to the Mobile Link FAQs.

Adobe Captivate 9.01 Update

Adobe Captivate 9 has an update available that includes a few new features along with some bug fixes. Be sure to go to Help->Updates to access this new update. Once the update has been applied, your Captivate version will display as 9.0.1.320. If your IT department is responsible for all software updates, you will want to make them aware of this update.

One exciting new feature available through this update is the ability to use Rulers & Guides within Captivate in a similar manner to other Adobe products. This is a feature that has been sorely lacking in previous versions and has frustrated many users. This new capability is well thought out within the program. You can set rulers and guides to be based on pixels or percentages depending upon whether you are working in a responsive or non-responsive project. Rulers are applied by default as percentage based for responsive projects, and pixel based for non-responsive projects. View the rulers and guides video to learn more about the new Rulers & Guides in this video.

Another new features is a small checkbox within the Object State area that allows you to retain the state of an object if a user revisits a slide. This simple checkbox sales you a lot of work when using multi-state objects.

Captivate Draft for the iPad has also had an update. This is a storyboarding program available with Captivate 9 that allows you to plan your projects and share these storyboards for team collaboration. You will find the app a bit easier to use with this update.

Another new feature from this update are some additional responsive navigation players that are now available for you to bring into your own projects. There can be some quirks to working with some of these new players, so you will want to view the video before working with these new responsive navigation players.

For more detailed explanation about how to install the update and all the new features available, visit Captivate 9.01 Release Notes.


Responsive Web Design & eLearning

Responsive designs for both websites and eLearning projects is here to stay. A responsive design is a page layout design that has different content layouts based on the screen size of the device viewing it. The big difference between a responsive layout and a non-responsive layout is that the content designer has factored in how to accommodate the best page layout for each device width.

The number of devices and screen sizes is growing, and with it the web community has learned to adapt to building websites and elearning projects to accommodate this new environment. I find that websites have come a long way in adopting responsive design.so users can easily view content on mobile devices, even screen sizes that are a third of the width of a standard web page for desktop.

Content creators for eLearning however, are not quite so up to date in thinking about page layouts for varying screen sizes. The assumption is that since the eLearning content is being delivered via an LMS (learning management system) the user will always be viewing the content via the desktop environment. This is becoming less and less the norm, with users needing to view eLearning content in any spare moments they have.

I have created 2 new training classes to get up to speed on working with responsive page layouts for both websites and eLearning projects. This is in response to my asking the question in Adobe Captivate classes “Do you plan to design your content for mLearning?”. Most people ask me “What is that?” and How do I create responsive Captivate projects?”.

For more information about my Responsive Web Design or Responsive Projects Using Adobe Captivate, please contact Candyce Mairs. Learn how to get your eLearning content moved into mLearning content today!


Captivate 9 Release

Captivate 9 was officially released recently, and there are lots of new features to check out. Learn more about all the new features and stay up to date on Captivate news at the Adobe Captivate Blog – Adobe Captivate 9 link.

Captivate 8 introduced the capability to create responsive elearning content that can adapt to mobile phone, tablet and desktop screen sizes automatically. This was a huge step forward for the program.

Captivate 9 introduces a new storyboard iPad app named Adobe Captivate Draft. This new app allows you to storyboard your elearning content including features for a team review process built into the app. Once the storyboard is finalized, you can open the storyboard in Captivate 9 and convert it to an elearning course.

Once your course is complete, you can upload it to a new Adobe LMS system named Adobe Captivate Prime. Learn more about Adobe Captivate Prime – Adobe Learning Management System (LMS) including a free trial of this new learning environment by Adobe.

Adobe now offers a complete elearning course workflow. Move from design and storyboarding using Captivate Draft, to course creation and completion using Captivate 9. Complete the workflow and publish to Captivate Prime.

Captivate 9 offers many new additional features beyond these 2 new programs. Download the Captivate 9 trial version and get started today!


Accessibility in eLearning

Accessibility on the web has been a concern for a long time. Internet users who cannot use a mouse or keyboard, or visually see the screen have great difficulty in everyday life as most companies have moved access to their services onto websites or mobile apps. Imagine trying to get any task done nowadays without the use of the internet via desktop, tablet or mobile phone.

Despite this being a huge issue for millions of users, companies still do not understand the importance of this issue. When I ask students in any of my Acrobat, Dreamweaver, Captivate or web classes about accessibility, they look at me blankly. Making your content accessible to users with screen readers is absolutely crucial to a company’s marketing strategy, yet it is overlooked by a majority of organizations including state, county, province and city websites.

eLearning Accessibility has this same issue. I get the same blank stare when I ask students in my eLearning classes about accessibility. I have yet to work with a company that has a concern about making eLearning content accessible.

Learning Solutions magazine is trying to address this issue in their article titled Nuts & Bolts: It’s not just about compliance accessibility in eLearning. It is important to include education about accessibility in any eLearning class, and this article addresses the issue head on. This article can act as a great resource for learning more about how to make content available to everyone. Make this process a part of your eLearning strategy, and get ahead of this issue within your organization. It is much more costly to have to redo content than to initially incorporate accessibility features into your courses.

For further assistance on accessibility in eLearning or more information on eLearning courses, contact Candyce Mairs.

Acrobat & Outlook 2013 Issue

Do you use Acrobat to create PDF versions of your emails or email folders on Windows? Are you having issues trying to do this using Outlook 2013? There is a known issue in this process when using Acrobat.

The Outlook plug-in for PDF Export and Acrobat do not seem to play nice with one another. The larger your emails, the worse this issue becomes. I have not been able to convert emails or email folders since my upgrade to Outlook 2013. The issue occurs with both Acrobat X & XI.

Basically, a plugin called HTML2PDFWrap controls this conversion process. Memory issues can occur when trying to convert emails of a large size or that contain many images. You can end this process if you have had issues by using the Windows Task Manager and choosing End Process. This does not correct the problem however.

The Adobe Acrobat Engineering team is aware of the issue, so hopefully there will be a fix in an Acrobat update coming soon. To date, I am still unable to use this capability.

This is a convenient feature within Acrobat that allows you to create PDFs of individual emails or folders within Outlook. This is a great way to save copies of emails so they are fully searchable and viewable on any machine that does not have Outlook installed. I use this process consistently so I have easy access to older emails without the need to store it all in my Outlook folder. I can keep this PDF online or on my local machine, so I have old emails readily accessible no matter where I am provided I have internet access. I do not need to use Outlook to view my emails stored in PDF format.

Let’s hope that the Acrobat Engineering team is able to fix this issue. This is a very convenient method for maintaining and controlling email content, and I miss having this capability. I will try and post an update if and when this issue has been fixed.


Adobe Publish & Adobe Acrobat DC

Spring is a time of change and renewal, and Adobe continues to follow that trend. Adobe has introduces a new product called Publish coming this Summer. Per Adobe directly, Adobe Publish is a platform that builds upon the foundation of Adobe Digital Publishing Suite (DPS) to bring the next generation of mobile app publishing. It will allow customers to make mobile apps for phones and tablets without requiring development and to produce and distribute great content in simple, cost-effective and modern ways. Learn more about it at the following:

Learn More about Adobe Publish

Adobe has also updated Adobe Acrobat, doing away with the version number attached to the product. The new version is called Adobe Acrobat DC, which stands for Document Cloud. This new version of Acrobat has quite a different look to it, so it may take some adjustment if you have been using Acrobat for many versions as I have.

The idea behind the product is to make Acrobat more mobile friendly, and this is the first official version that should be fully compatible with mobile devices. Another huge advantage to this version is it comes with built-in signing features that allow you to easily sign & send PDFs directly within Acrobat on any device.

This is an exciting upgrade that makes using Acrobat on any device a simple process. Get more information about this release at:

Learn more about Adobe Document Cloud (DC) & Acrobat

Adobe FormsCentral Alternatives

If you’re one of the many Adobe FormsCentral users being kicked to the proverbial form curb by the product’s announced retirement, you may have a few lingering questions. Like: “Why did Adobe close this product in the first place?” Or even: “What do I do if I’ve already paid for a membership to FormsCentral?”

But if the Adobe support forum is any indication, the most pressing concern is: “What is going to replace Adobe FormsCentral?”

Adobe users utilized FormsCentral for reasons spanning from simple contact forms, surveys and even converting web forms to PDFs. So you can’t blame users for being overwhelmed by the replacement choices; and there’s certainly no shortage of them. But the reality is, some alternatives are going to suite your specific needs better than others.

Here are the best FormsCentral alternatives based on their different capabilities:

Offline Workflow: JotForm

JotForm is famous for ease of use in building forms, but the company’s new Fillable PDF Form Creator makes them the top choice for offline workflow capabilities.

With this feature, users can seamlessly export forms as fillable PDFs then send it out to their intended recipients. The great thing is that response data from the PDF will be saved in their JotForm account when someone submits a response. The PDF forms are also available offline and can be filled out anywhere.

Surveys: Survey Monkey

One common use case for FormsCentral is surveys. Although surveys are a pretty standard capability for any form building service, Survey Monkey makes it their business to excel in this arena – and they do.

When it comes to not only gathering information for respondents, but analyzing the data, Survey Monkey really shines. Whether you’re looking to analyze individual responses, question summaries, or even open-ended responses, they feature incredibly power tools to sift through the information. What’s really cool is a text analysis feature that lets you categorize, code and filter response info by select words and phrases.

508 Compliance: Formstack

If you need a form service that let’s you stay 508 compliant, then you need Formstack. And just a refresher on compliance codes: 508 compliant means that people with disabilities are able to fill out the forms. For this reason Formstack has been one of the popular choices for government agencies who are required to provide 508 compliance.

Inventive Interface: Typeform

Typeform is a wonderful option if you’re looking to to really branch away from the standard form building interface. Their one-question-at-a-time usability makes it stand out. While this functionality might not be a best practice for your respondents are using a desktop, it’s mobile practicality is hard to ignore.

Bright, easy, clear buttons make this a very popular choice for mobile, and it’s definitely the biggest departure from what you’re used to from FormsCentral.

Adobe’s closure of FormsCentral has sent users scrambling for alternatives and the options above are alternatives worth looking into. PDF forms are an important part of any business. If you need assistance with transitioning from FormsCentral to another service, or wish to set up your own PDF forms workflow, please contact Candyce Mairs.

Emmet Toolkit for Dreamweaver

Emmet offers a toolkit for creating and working with HTML using a CSS style shorthand. Working and creating code for HTML pages can be substantially cut down using the Emmet Toolkit. This toolkit is available for a variety of text editors including Dreamweaver. Check here to view if there is an extension for your favorite text editor.

The Dreamweaver extension can be downloaded from the Emmet website. Once downloaded, simply double click the .zxp file and the Dreamweaver Extension Manager will open and install the extension for you. It can’t be any simpler than that!

Once downloaded, you can begin to code using the Emmet shortcut commands in Code View. An Emmet cheat sheet is available to learn Emmet commands very easily.

Emmet offers the capability to speed up your code creation by typing CSS style code, and Emmet processes that shorthand and creates full HTML coding. The Emmet style of coding allows you to cut down the time it takes to code your pages because you are not having to type the entire code base yourself. Add to that the issue of typing errors, and you can see how typing less code also means correcting less typing errors.

Here is an example. Let’s say we want to add an unordered (bulleted) list to our HTML page. In order for Emmet to process the shorthand code, your cursor must be at the end of the line of code. Then press ctrl/cmd E and Emmet works its magic!

Using Emmet we simply type this:

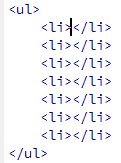
To create an unordered list with 7 list items using Emmet:

ul>li*7

Place your cursor after the 7 in the code above and use ctrl/cmd E. Emmet creates the following for you:

 emmet-bulleted-list

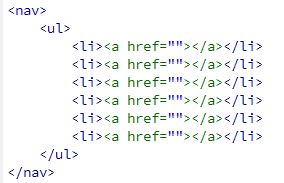
To create a navigation bar using Emmet:

nav>ul>li*6>a

Place your cursor at the end of the code line and hit ctrl/cmd E:

Emmet outputs the following:

nav-bar-emmet

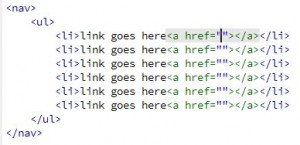
 To add text to the navigation bar as a placeholder for links, add text in curly brackets:

nav>ul>li{link goes here}*6>a

emmet-nav-bar-text

 Emmet can create div tags with classes and ids using the following code:

#footer>p.copyright

Hit ctrl/cmd E and you get the following:

emmet-div-footer

The examples above only touch the surface of what Emmet can do for you. Speed up your coding and become more efficient using Emmet. Learn more about the Emmet Toolkit at Emmet.io.

Insert Copyright Symbol within Dreamweaver

Every had strange characters show up on your web pages? One of the benefits of using Dreamweaver is that you do not need to be concerned about special characters within your web pages. As long as you use the special characters feature within Dreamweaver to insert these characters onto your web pages, they will always appear correctly. It is important not to use the special characters directly from your operating system character map since a browser does not understand these characters.

When inserting special characters into a web page, it is important to use ASCII characters for HTML entities. These should be used when inserting special characters for symbols such as copyright, registered, and trademarks. Each of these HTML entity special characters require an & at the beginning and a semi-colon at the end. You can view a listing of these characters at https://cmairscreate.com/category/resources/html-2/ and choosing the first link for ASCII characters.

To insert the copyright symbole correctly, use the special characters feature within Dreamweaver. If you use Insert->Character and choose Copyright, Dreamweaver will create the correct ASCII characters on your web page. If you are inserting these characters directly from your operating system using a shortcut command, these characters will not display correctly on the web page once the page has been uploaded to a web server.

Be sure to use the Insert command or Insert panel within Dreamweaver to add these special characters to your pages to prevent special character issues on your pages.